
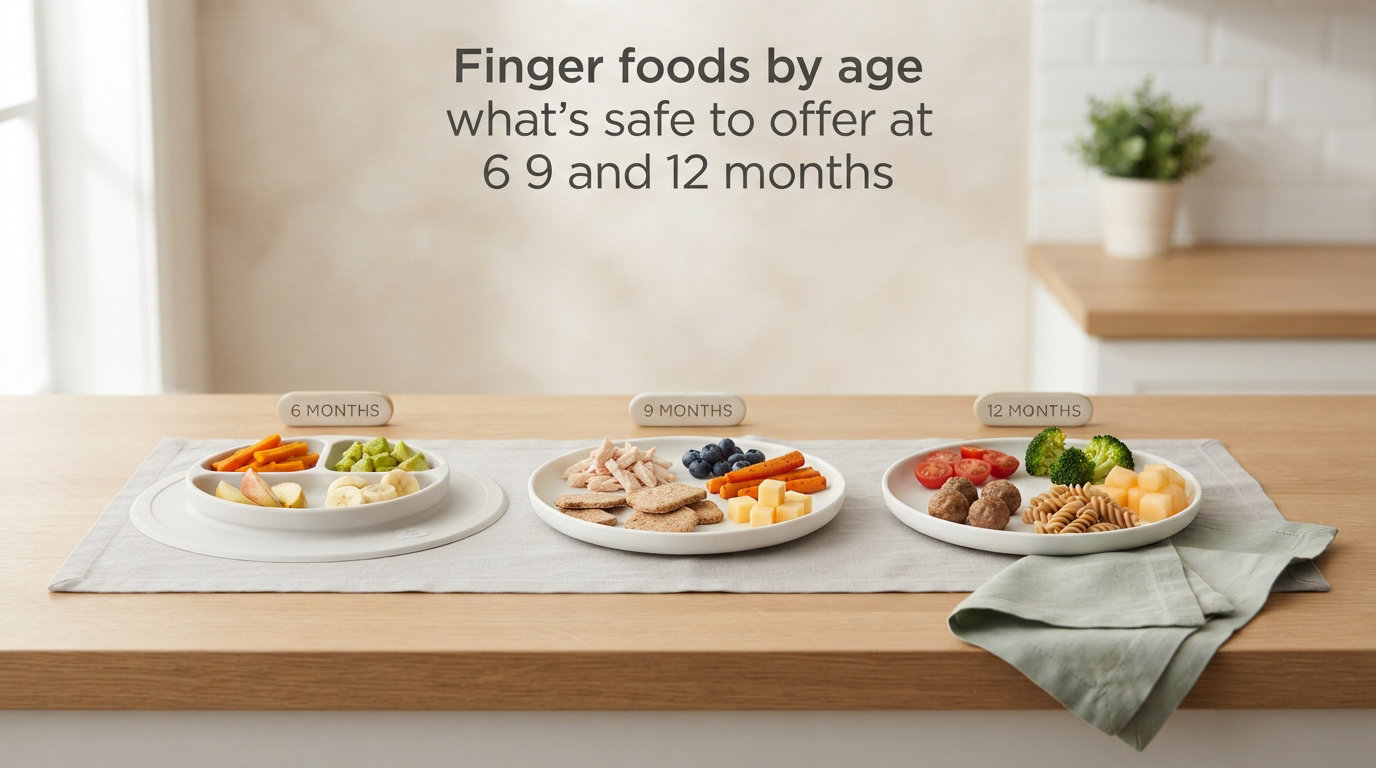
Starting solids is an exciting milestone, but many parents feel overwhelmed when it comes to finger foods by age. I remember standing in my kitchen, staring at a sweet potato and wondering if I was cutting it correctly for my 6-month-old. The good news is that feeding your baby finger foods does not have to be complicated once you understand the basic safety principles and developmental stages.
Finger foods are soft, graspable pieces of food that babies can hold and feed themselves. They play a crucial role in developing fine motor skills, hand-eye coordination, and independent eating habits. Whether you are following baby-led weaning or combining purees with self-feeding, offering appropriate finger foods by age helps your baby explore textures, tastes, and the mechanics of chewing.
In this guide, I will walk you through exactly what finger foods are safe to offer at 6, 9, and 12 months. You will learn how to prepare foods to prevent choking, what size pieces work best at each stage, and how to support your baby’s developmental progress from the first palmar grasp to the advanced pincer grasp.
Table of Contents
How to Know Your Baby Is Ready for Finger Foods?
Most babies are ready to start finger foods around 6 months of age. However, age alone is not the only indicator. Your baby needs to demonstrate specific developmental milestones before safely handling finger foods.
Look for these readiness signs:
Sitting upright with minimal support: Your baby should be able to sit in a high chair or feeding seat with good head and neck control. This stable posture helps them swallow safely and reduces choking risk.
Showing interest in food: Does your baby watch you eat, reach for your plate, or open their mouth when food approaches? These curiosity signals indicate readiness to participate in family meals.
Losing the tongue-thrust reflex: Young babies automatically push foreign objects out of their mouths with their tongues. When this reflex fades, usually around 4 to 6 months, your baby can begin manipulating food in their mouth.
Bringing objects to their mouth: If your baby is already putting toys and their hands in their mouth, they are practicing the motor skills needed for self-feeding.
Every baby develops at their own pace. Some may be ready slightly before 6 months, while others need a few more weeks. Trust your observations and consult your pediatrician if you have concerns about developmental readiness.
Finger Foods by Age: A Complete Guide
Understanding finger foods by age means recognizing how your baby’s abilities change over time. The progression from 6 to 12 months involves significant motor skill development, and the food sizes and textures you offer should evolve accordingly.
6 Months: First Finger Foods
At 6 months, babies use a palmar grasp to hold objects. This means they wrap their entire hand around items and bring them to their mouth. For this reason, finger foods for 6-month-olds need to be large enough to protrude from their closed fist.
The finger-length strip rule: Cut foods into strips about the size and width of your adult finger. These pieces should be long enough that your baby can hold one end while munching on the other.
Best first finger foods for 6-month-olds:
Steamed or roasted sweet potato strips are a perfect starting point. They are naturally sweet, packed with nutrients, and soft enough to gum even without teeth.
Avocado slices with the peel left on provide natural grip for slippery hands. The peel helps your baby hold the avocado while the soft flesh is easy to mash against the roof of their mouth.
Toast strips lightly spread with butter or mashed banana offer a different texture experience. The rough surface helps babies learn to manage crumbs and varying consistencies.
Banana pieces work well when cut into thirds lengthwise. You can leave some peel on the bottom half to reduce slipperiness.
Steamed broccoli florets with long stems give babies a natural handle to grip. The texture also provides sensory exploration with its bumpy surface.
Scrambled eggs in large fluffy curds provide protein and iron. Make sure eggs are fully cooked through.
Soft pear or peach slices, ripe enough to mash easily, introduce new flavors and natural sweetness.
Important safety note: Even babies with no teeth can handle these foods. Their gums are surprisingly strong and capable of mashing soft textures. Focus on the softness of the food rather than whether your baby has teeth yet.
9 Months: Developing the Pincer Grasp
Between 8 and 9 months, most babies develop the pincer grasp. This is the ability to pick up small objects using the thumb and forefinger. This fine motor milestone changes everything about how you should prepare finger foods.
Transition to bite-sized pieces: Now you can offer pea-sized or blueberry-sized pieces. These small bits challenge your baby’s new precision skills and keep them engaged with their meals.
Best finger foods for 9-month-olds:
Soft cooked beans like black beans or chickpeas (flattened slightly) provide protein and are the perfect size for pincer grasp practice.
Pea-sized pieces of ripe banana, avocado, or cooked sweet potato allow your baby to practice picking up multiple pieces in succession.
Small cubes of soft cheese such as mozzarella or cheddar offer calcium and fat for brain development.
Ground or shredded meat in tiny pieces introduces iron-rich proteins. Make sure the texture is moist and not dry or chewy.
Small pasta shapes like mini shells or cut rotini, cooked until very soft, are fun to pick up and explore.
Well-cooked vegetables cut into small cubes, such as carrots, zucchini, or butternut squash, continue building familiarity with vegetables.
Blueberries cut in quarters (never whole) or raspberries halved provide antioxidants and natural sweetness.
Texture expansion: At 9 months, you can also start offering more complex textures like soft casseroles, mashed beans with small lumps, and foods with mixed consistencies.
12 Months: Eating Family Foods
By 12 months, your baby should be eating modified versions of what the family enjoys. Their chewing skills have developed significantly, and they can handle more variety in textures and food types.
What changes at 12 months:
Your baby can now manage slightly firmer textures that require more chewing. They are also becoming more efficient at using utensils, though finger foods remain important for hand-eye coordination.
Best finger foods for 12-month-olds:
Soft cooked vegetables in various shapes, including roasted vegetable sticks, steamed green beans, or baked sweet potato wedges.
Small pieces of tender cooked chicken, turkey, or lean beef provide essential iron and protein.
Pasta cut into manageable pieces, including whole grain varieties for added nutrition.
Soft fruits like ripe melon chunks, mango pieces, or stewed apple slices offer vitamins and natural sweetness.
Egg preparations such as small pieces of omelet, frittata, or hard-boiled egg quarters.
Soft whole grain toast fingers with nut butter thinly spread (if allergens have been safely introduced).
Small pieces of well-cooked fish like salmon or cod, checking carefully for bones.
Rice dishes such as fried rice with soft vegetables and small protein pieces.
Transition to table foods: By 12 months, many babies can eat most family meals with simple modifications. Cut foods appropriately, ensure meats are tender, and avoid adding salt or sugar to their portions.
Sample Meal Ideas by Age
Having concrete examples helps take the guesswork out of meal planning. Here are sample menus that incorporate finger foods by age while ensuring nutritional balance.
Sample Day for 6-Month-Old
Breakfast: Toast strip with mashed avocado, breast milk or formula
Lunch: Steamed broccoli floret with long stem, sweet potato strip, breast milk or formula
Dinner: Fluffy scrambled egg curds, soft banana slice, breast milk or formula
Sample Day for 9-Month-Old
Breakfast: Small cubes of soft cheese, quartered blueberries, toast fingers
Lunch: Chickpeas flattened slightly, steamed zucchini cubes, small pasta shapes
Dinner: Ground beef in tiny pieces, sweet potato cubes, soft pear pieces
Sample Day for 12-Month-Old
Breakfast: Small omelet pieces, banana chunks, toast with thin nut butter spread
Lunch: Soft chicken pieces, cooked rice with vegetables, melon cubes
Dinner: Pasta with soft meat sauce, steamed green beans, stewed apple
Iron focus: Include iron-rich foods at least twice daily. Good options include meat, beans, lentils, eggs, and iron-fortified cereals. Pairing these with vitamin C-rich foods like fruits helps iron absorption.
Choking Prevention and Food Safety
Choking is the number one concern parents have about finger foods. Understanding the difference between gagging and choking, along with proper food preparation, can help you feel more confident.
Gagging vs. Choking: What Parents Need to Know
Gagging is a normal protective reflex that helps babies learn to manage food in their mouths. When a baby gags, they may cough, make noises, and push food forward with their tongue. This is learning in action and usually resolves quickly.
Choking is silent and dangerous. A choking baby cannot cough, cry, or make sounds because their airway is blocked. They may turn blue around the lips and require immediate intervention.
If your baby is gagging, stay calm and give them time to work it out. Interfering can actually increase choking risk. If your baby is choking, call emergency services immediately and perform infant choking first aid if trained.
The 90-90-90 Rule for Feeding Safety
The 90-90-90 rule is a helpful guideline for safe feeding: your baby should be sitting at 90 degrees (upright), the food should be soft enough to mash with 90 pounds of pressure (very soft), and you should supervise within 90 centimeters (arm’s reach).
High-Risk Choking Hazards to Avoid
These foods should be avoided or carefully modified before offering to babies:
Whole grapes should always be quartered lengthwise, never served whole or halved crosswise.
Raw vegetables like carrots or apples should be cooked until soft or grated finely.
Nuts and seeds are choking hazards; use thinly spread nut butters instead of whole nuts until age 4 or 5.
Popcorn, hard candies, and chewing gum should be avoided entirely until much older.
Hot dogs and sausages should be cut lengthwise into quarters and then sliced, never served in coin shapes.
Whole cherry tomatoes should be quartered, and all pits should be removed from fruits.
Marshmallows, hard pretzels, and chips can block airways and should be avoided.
Chunks of meat or cheese should be shredded, ground, or cut into very small, manageable pieces.
Safe Food Preparation Techniques
Always cook vegetables until they can be easily mashed between your thumb and forefinger. This ensures your baby can gum or chew them safely even without teeth.
Remove all pits, seeds, and tough skins from fruits. Peel apples, pears, and stone fruits before serving.
Grate hard fruits and vegetables like apples and carrots if serving raw, or cook them until soft.
Cut cylindrical foods like bananas and hot dogs into lengthwise strips rather than round coins. Round shapes match the airway and create higher choking risk.
Test food temperature carefully. Foods should be warm or room temperature, never hot enough to burn your baby’s mouth.
Tips for Success with Finger Foods
Beyond the basics of what to serve, there are practical strategies that can make your finger food journey smoother and more enjoyable for both you and your baby.
Managing the Mess
Self-feeding is inherently messy, and that is developmentally appropriate. Babies explore food with all their senses, and touching, squishing, and dropping food are part of learning.
Use a high chair with a footrest so your baby has stable support while eating. This actually reduces dropping because they are not focusing on keeping their balance.
Place a plastic mat or old shower curtain under the high chair to catch falling food. Many parents find a dog nearby helps with cleanup, or you can sweep easily after meals.
Offer foods in a suction bowl or directly on the high chair tray to reduce plate-throwing incidents.
Embrace the mess as temporary. By age 2 or 3, most children have developed enough coordination to eat more neatly.
Combining Finger Foods with Allergen Introduction
Finger foods provide an excellent opportunity to introduce common allergens in controlled amounts. Current guidelines suggest introducing allergens like peanuts, eggs, and fish early and often, rather than delaying them.
When introducing a new allergen, offer it early in the day when you can watch for reactions. Start with a small amount and watch for hives, vomiting, or breathing difficulties.
Peanut butter can be thinned with warm water and spread thinly on toast strips. Whole nuts remain a choking hazard, so stick to smooth nut butters.
Well-cooked scrambled eggs make excellent finger food and allow you to monitor your baby’s reaction to egg protein.
Small pieces of cooked fish or yogurt drops can introduce dairy and seafood allergens safely.
Eating Out and Traveling
Restaurants and travel present unique challenges for finger food feeding. With some planning, you can maintain safe feeding practices away from home.
Request simple preparations when dining out. Steamed vegetables, soft rice, avocado slices, and plain chicken are usually available and can be modified for your baby.
Bring a portable placemat or silicone mat that sticks to restaurant tables. This creates a clean eating surface wherever you go.
Pack familiar finger foods for travel days. Steamed vegetable strips, cheese cubes, and soft fruit travel well in small cooler bags.
Packable finger food options include banana (bring a whole one and break off pieces), cheese sticks cut into cubes, and steamed sweet potato strips in a container.
When Your Baby Refuses Finger Foods
Not all babies take to finger foods immediately. If your baby turns away or seems frustrated, try these strategies:
Offer finger foods at the beginning of a meal when hunger is strongest. A hungry baby is more motivated to try new things.
Model eating the same foods yourself. Babies learn by watching and often want what is on your plate more than their own.
Keep the pressure low. Place foods on the tray without comment and let your baby explore at their own pace. Forcing or coaxing can create negative associations.
Try different textures. Some babies prefer very soft foods while others enjoy more resistance. Offer variety and observe preferences.
If refusal persists beyond a few weeks, consult your pediatrician. There may be underlying oral motor or sensory issues worth evaluating.
Babies with Developmental Delays
Some babies may need modified approaches to finger foods due to developmental delays or medical conditions. Working with a pediatric feeding specialist can provide individualized guidance.
For babies with oral motor delays, foods may need to be softer or textures introduced more gradually. A therapist can recommend specific textures appropriate for your baby’s skill level.
Babies with sensory sensitivities may benefit from exposure to new foods without pressure to eat. Simply having foods nearby and touching them counts as progress.
Premature babies often follow adjusted timelines based on their corrected age rather than chronological age when introducing finger foods.
Always consult with your pediatrician or a feeding therapist if you have concerns about your baby’s feeding development.
Frequently Asked Questions
What finger foods are safe for a 6 month old?
Safe finger foods for 6-month-olds include steamed sweet potato strips, avocado slices with peel left on for grip, soft banana pieces cut lengthwise, toast fingers with butter, steamed broccoli florets with long stems, fluffy scrambled eggs, and soft ripe pear slices. Cut all foods into finger-length strips about the size of your adult finger so your baby can hold one end while eating the other. Foods should be soft enough to mash between your thumb and forefinger.
What age can babies eat finger foods?
Most babies are ready for finger foods around 6 months of age. Readiness depends on developmental milestones rather than age alone. Your baby should sit upright with minimal support, show interest in food, have lost the tongue-thrust reflex, and be able to bring objects to their mouth. Some babies may be ready slightly before 6 months while others need a few more weeks.
What finger foods for a 6 month old with no teeth?
Babies do not need teeth to eat finger foods. Their gums are strong enough to mash soft textures. Good options for toothless 6-month-olds include steamed sweet potato strips, ripe avocado slices, soft banana pieces, scrambled eggs, very soft cooked carrots, toast strips softened with butter or banana, steamed zucchini, and ripe pear slices. The key is the food’s softness, not your baby’s tooth development.
What can babies eat at 9 to 12 months?
From 9 to 12 months, babies can progress from large finger-length strips to bite-sized pieces they pick up with their pincer grasp. At 9 months, offer pea-sized pieces of soft foods like cooked beans, cheese cubes, ground meat, small pasta shapes, and quartered blueberries. By 12 months, babies can eat modified family meals including soft cooked vegetables, tender meat pieces, pasta dishes, egg preparations, and soft fruits. Always cut foods appropriately and avoid choking hazards.
What is the 90-90-90 rule for feeding?
The 90-90-90 rule is a safety guideline for feeding babies: your baby should be sitting at 90 degrees (upright in a high chair), the food should be soft enough to mash with 90 pounds of pressure (easily squished between thumb and forefinger), and you should supervise from within 90 centimeters (arm’s reach). This positioning ensures safe swallowing and allows quick response if your baby needs help.
How big should finger foods be for baby?
For 6 to 8-month-olds using a palmar grasp, cut foods into finger-length strips about the size and width of an adult finger. These pieces should be long enough to protrude from your baby’s closed fist. For 9 to 12-month-olds who have developed the pincer grasp, offer pea-sized or blueberry-sized pieces that can be picked up with thumb and forefinger. Always adjust food size to match your baby’s developmental stage.
What finger foods help with pincer grasp development?
Small, pick-up-able foods help develop the pincer grasp. Good options include cooked beans flattened slightly, pea-sized banana or avocado pieces, small cheese cubes, quartered blueberries or halved raspberries, mini pasta shapes, well-cooked vegetable cubes, and small ground meat pieces. These bite-sized foods require your baby to use their thumb and forefinger together, strengthening fine motor coordination.
Can you combine purees and finger foods?
Yes, combining purees and finger foods is a valid and popular approach. Many parents offer purees on a spoon at the beginning of a meal and follow with finger foods for self-feeding practice. This combination feeding allows your baby to get adequate nutrition from purees while developing independence and motor skills with finger foods. There is no need to choose one method exclusively.
Conclusion
Understanding finger foods by age gives you the confidence to support your baby’s feeding journey from those first wobbly grasp attempts to independent family meals. The progression from large finger-length strips at 6 months, through bite-sized pincer grasp foods at 9 months, to modified table foods at 12 months follows natural developmental milestones.
Remember that every baby develops at their own pace. Some may take to finger foods immediately while others need repeated exposure. Stay consistent, keep meals low-pressure, and focus on making eating an enjoyable exploration rather than a battle.
Safety remains the foundation of all finger food feeding. Follow the 90-90-90 rule, prepare foods to appropriate sizes, avoid high-risk choking hazards, and know the difference between gagging and choking. When in doubt, consult your pediatrician or a pediatric feeding specialist.
Your baby’s first year of eating sets the stage for a lifetime of food relationships. By offering a variety of finger foods by age, you are building not just motor skills and independence, but curiosity, confidence, and a love of nourishing food that can last a lifetime.